Before I did that graffiti under the bridge, we (me and my friend "fukka") were looking for more meaningful place to paste our work. We came up with Berlin wall at Jong-ro, but historically it was too important to mess up. So I just made another couple of images using photoshop.
A friend of mine suggested to draw or paste pictures on some moving structure, then I thought it would be nice to have drawings with a story on any kind of rotating structure. With that in mind, wanted to look how it would be so I made this image. If that drawing was painted well, it could be some interesting work.
1. Photoshop image with my drawing 2. Somebody else's work(too bad I forgot who it was...)
These are another "testing" works for transparent graffiti. The idea was to draw pictures on glass or window instead of vinyl, so those pix can be matched with real environment when watched at certain spot. This idea was used in a movie (For Love Or Money, 1993).
Tried open-shutter pictures here. I didn't have strobe lights so used a lantern to have lights. And I also did this just by myself (it was 3:00 am), so I couldn't take pictures about motions. I just could change my positions.
These are images captured from music videos, and my personal works. Captured about 15-20 images from one clip, then put them altogether in one frame. Some good, some bad.
So this is the FINAL video WITHOUT any interactivity. If I could only download or purchase the full version of Isadora, then it will be real time-interactive video.
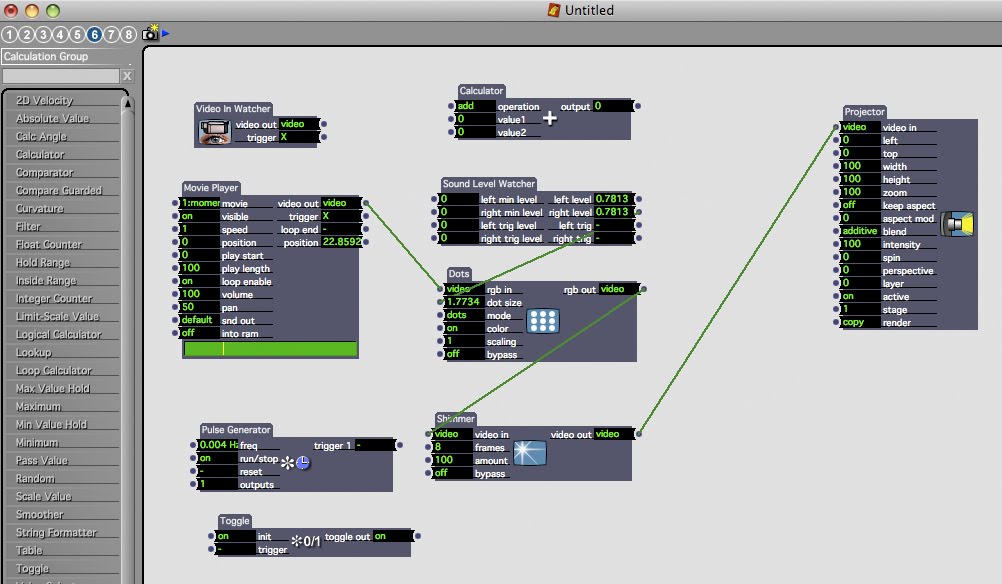
After video clip was done, I downloaded demo version of ISADORA and tried to make a sound-interactive video. It worked well and I was satisfied with result EXCEPT ONE THING.
The demo version of Isadora was able to put out the video to another device only for 10 seconds. And it couldn't be recorded neither. I only could capture some part of the clip without the sound.
As you can see here, LED circuit was supposed to be in between the camera and television. But after trying some kind of light flashing effect, I thought that just flashing lights will not make any huge changes in screen. So i decided to make a short music video first using televsion feedback images as sources, and after that interactivity thing will be put using program (ISADORA).
At first, I tried to use a beam projector, shooting it on the surface of television while that television is displaying same feature with projector. To show same movie in slightly different time was my purpose, so i could have some kind of traces.
But, the beam wasn't strong enough to see the feature from the projector when it was displayed on the bright tv screen, and I could only see the image from tv.
So I gave up using projector and decided to connect dv cam directly to tv.
I tried to shot two different images with same motion, one using that black paper with a hole. And put them together to have some kind of time lag image. Didn't work out that well I think, and after seeing this, professor David Hall suggested to use a projector for time lag images.
When I was doing this, I was really confused about differences between (in-camera effects) and (post-camera effects). I just didn't know what to do. So I attached a black paper which has a small hole in middle on camera lens, and used digital effect (solarize). The results looked like having 3-4 layers. But they have nothing to do with motions.